Building No Signal using Flutter and Appwrite [Part 3]
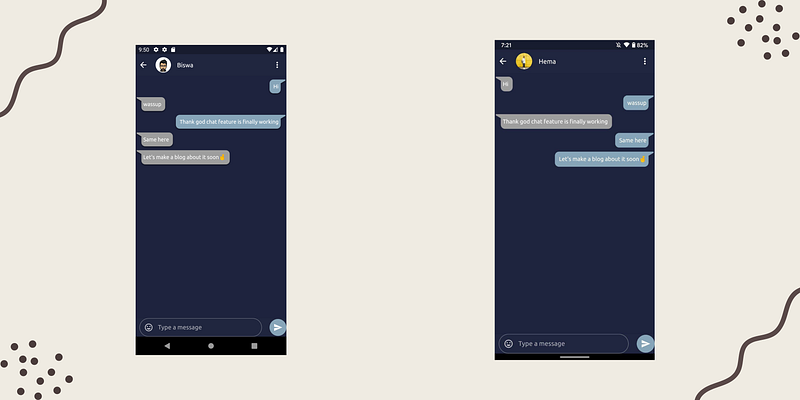
We are approaching the end game now. The time has come where we will finally discuss about implementing the chat feature in our app.

but before that, let’s talk about our app flow first. We are almost nearing completing our app and we haven’t discussed it yet.
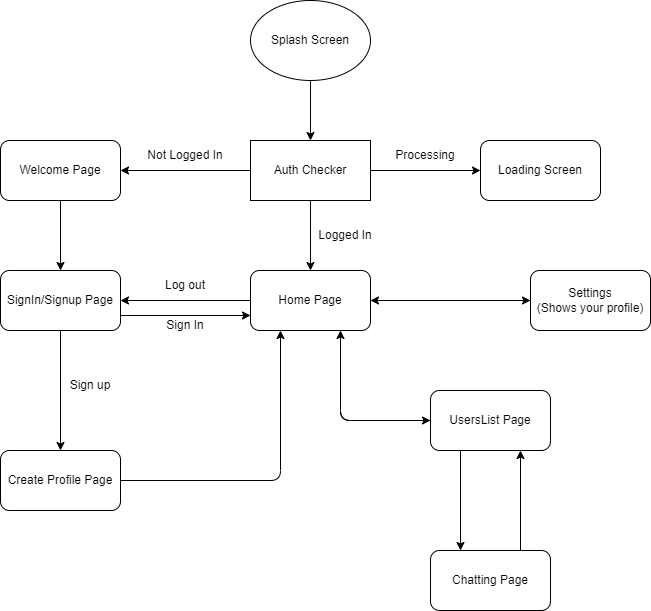
That’s the basic flow. Not too complex. Also I believe this can be scalable in future too. For example, if a user signIn but does not have a profile ready we can add a block there without any difficulties.
That being the basic app flow, Let’s discuss about Chat Architecture now
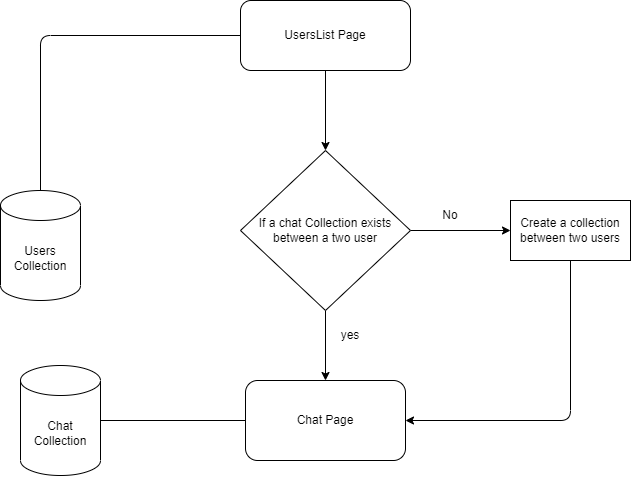
To start chatting, you need to go to Users List Page to get a list of users who uses your app. Next thing is to select a user you want to chat. Now an internal check is added in the function to check if a chat history between them exists or not, if yes you are redirected to Chat page with the old chats. If it doesn’t exists then a new collection is created and then redirected to chat page.
Let’s Talk about CHAT Model First
For any particular conversation between 2 users, what minimum fields do we need for that collection?
// ignore_for_file: constant_identifier_names

enum MessageType {
  TEXT,
  IMAGE,
  VIDEO,
}

/// [Chat]
/// Chat Model for defining the chat data
class Chat {
  final String senderName;
  final String senderid;
  final String message;
  final MessageType type;
  final DateTime time;
  Chat({
    required this.senderName,
    required this.senderid,
    required this.message,
    this.type = MessageType.TEXT,
    required this.time,
  });

  Map<String, dynamic> toMap() {
    return {
      'sender_name': senderName,
      'sender_id': senderid,
      'message': message,
      'time': time.toIso8601String(),
      'message_type': type.name,
    };
  }

  factory Chat.fromMap(Map<String, dynamic> map) {
    return Chat(
      senderName: map['sender_name'],
      senderid: map['sender_id'],
      message: map['message'],
      time: DateTime.parse(map['time']),
      // type: MessageType.values.,
    );
  }
}
Looks Right?
I believe these are the minimum data required so as to establish a connection between 2 users and have a convo.
So, Every collection denotes a conversation between 2 users. This blog targets sending only text messages and convo between 2 people but the same logic can be scaled for further more users and sending different types of messages.
NOTE: Since Appwrite does not allow to create and define a new collection on client side, we would be using the server side APIs for this to work.
Let’s Create a new API Key
- Open up your Appwrite Console
- Go to API Keys
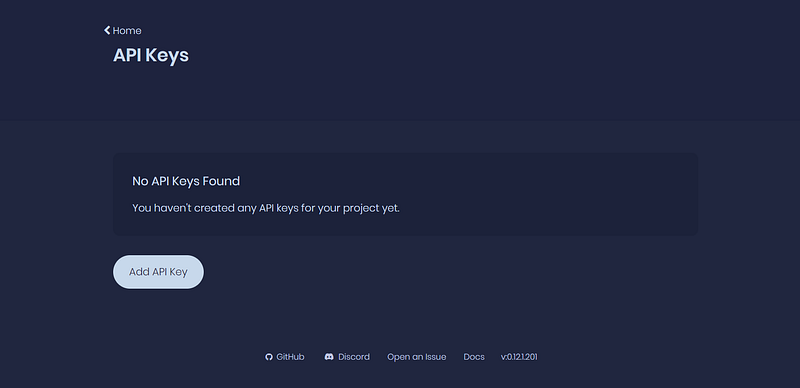
3. Click Add API Key
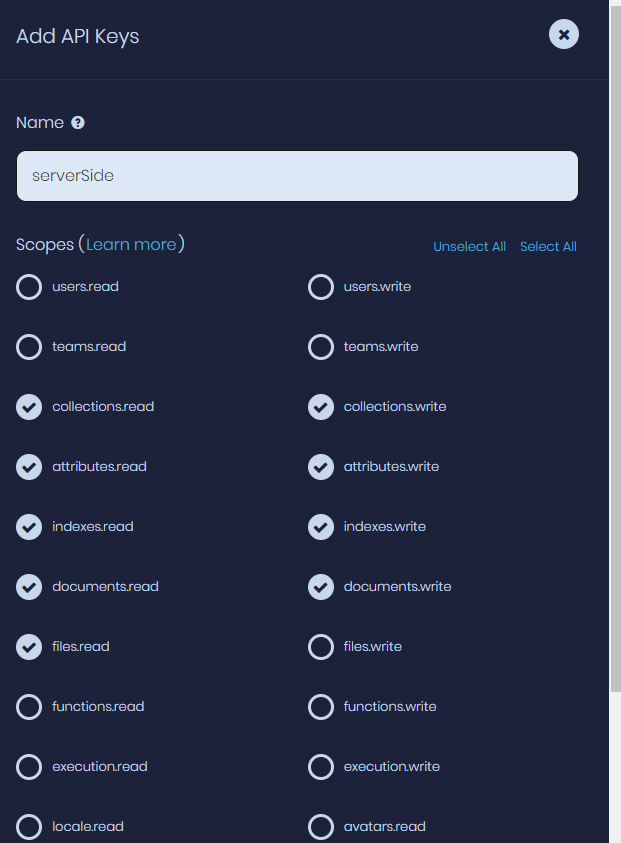
4. Choose a name and select the following scopes.
5. Click Create
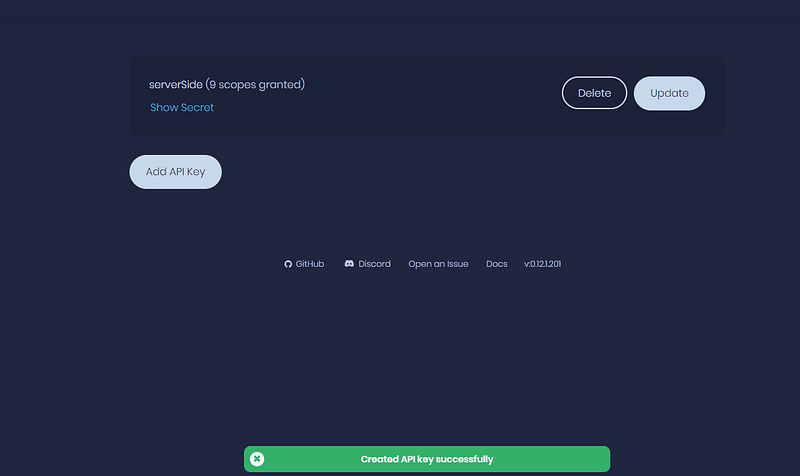
You should have something like this then. Click on Show Secret and copy the key.
Let’s Move over to Code-Editor now
Since, we are gonna use a server side APIs, we need a server side SDK too. Add the following dependencies in pubspec.yaml
dependencies:
  dart_appwrite: ^3.0.2
Add a new block of code in the file client.dart under providers/ .
import 'package:dart_appwrite/dart_appwrite.dart' as appwrite;

/// [dartClientProvider]
/// This provides a [appwrite.Client] object from `dart_appwrite` package.
/// Since the names of both classes are the same, we are using `as` to the
/// server client package
/// Just provide an secret key with all the neccessary permissions and it's ready
final dartclientProvider = Provider<appwrite.Client>((ref) {
  return appwrite.Client()
      .setEndpoint(http://192.168.1.26:5000/v1)
      .setProject(nosignal)
      .setKey("enter-secret-long-key")
      .setSelfSigned(status: true);
});
Let’s create a new file server_api.dart under api/database . This file would contain all the server side functions.
import 'package:dart_appwrite/dart_appwrite.dart';
import 'package:dart_appwrite/models.dart';
import 'package:flutter/cupertino.dart';
import 'package:no_signal/utils/split_string.dart';

/// This class contains all the functions which can't be performed on client side
/// so we are making a seperate class to perform these server side functions.
/// Since the api are different from the client side, we are using the `dart_appwrite`
class ServerApi {
  // Note: These Classes are from `dart_appwrite` package.
  // So there are more functionalities and features than the client side package
  final Client client;
  late final Account account;
  late final Database database;
  late final Storage storage;

  /// Constructor to initialize the client and other api services
  ServerApi(this.client) {
    account = Account(client);
    database = Database(client);
    storage = Storage(client);
  }


  /// This function will create a new Convo Collection between two users
  /// If the collection exists or not, it will return the collection Id.
  Future<String?> createConversation(
      String curruserId, String otheruserId) async {
    /// For collection id, we are using the combination of the two user id
    /// collectionId = '${curruserId/2}_${otheruserId/2}'; or
    /// collectionId = '${otheruserId/2}_${curruserId/2}';
    /// Because curruser and otheruserId is interchangable for both the users
    /// Divide by 2 means we are creating a substring of the user id of length
    /// half of the current userId.
    /// Then We are concatenating those two substring with '_'.
    /// This is the collection id.
    /// Currently this is the way, I am making the collection.
    /// OfCourse, this can be improved a lot better.
    Collection? collection;
    // Check if the collection exists or not
    try {
      // We will try to get the collection in the first try
      collection = await database.getCollection(
          collectionId:
              '${curruserId.splitByLength((curruserId.length) ~/ 2)[0]}_${otheruserId.splitByLength((otheruserId.length) ~/ 2)[0]}');
    } on AppwriteException catch (e) {
      // If the collection doesn't exist, we will try with another id
      if (e.code == 404) {
        try {
          collection = await database.getCollection(
              collectionId:
                  '${otheruserId.splitByLength((otheruserId.length) ~/ 2)[0]}_${curruserId.splitByLength((curruserId.length) ~/ 2)[0]}');
        } on AppwriteException catch (e) {
          // If it still doesn't exists then we will create a new collection
          if (e.code == 404) {
            // Create a new collection
            collection = await database.createCollection(
              collectionId:
                  '${curruserId.splitByLength((curruserId.length) ~/ 2)[0]}_${otheruserId.splitByLength((otheruserId.length) ~/ 2)[0]}',
              name:
                  '${curruserId.splitByLength((curruserId.length) ~/ 2)[0]}_${otheruserId.splitByLength((otheruserId.length) ~/ 2)[0]}',
              read: ["user:$curruserId", "user:$otheruserId"],
              write: ["user:$curruserId", "user:$otheruserId"],
              permission: 'collection',
            );
          } else {
            // If there is any other error, we will throw it
            rethrow;
          }
        }
      } else {
        // Same goes for here. Anything can happen between the two tries
        rethrow;
      }
    }

    /// If the collection attributes are empty, then we will define those attributes
    if (collection.attributes.isEmpty) {
      await _defineDocument(collection.$id);
    }
    // Return the collection id
    return collection.$id;
  }

  /// This function will define the attributes of the collection
  /// This function will be called only once when the collection is created
  /// A private function cause we don't want that to be called from outside
  Future<void> _defineDocument(String collectionId) async {
    // Defining attributes
    try {
      // You are free to choose your own key name.
      // But make to sure to replace those things in the model too.
      await database.createStringAttribute(
          collectionId: collectionId,
          key: "sender_name",
          size: 255,
          xrequired: true);
      await database.createStringAttribute(
          collectionId: collectionId,
          key: "sender_id",
          size: 255,
          xrequired: true);
      await database.createStringAttribute(
          collectionId: collectionId,
          key: "message",
          size: 255,
          xrequired: true);
      await database.createStringAttribute(
          collectionId: collectionId, key: "time", size: 255, xrequired: true);
      await database.createEnumAttribute(
          collectionId: collectionId,
          key: "message_type",
          elements: ["IMAGE", "VIDEO", "TEXT"],
          xdefault: "TEXT",
          xrequired: false);
    } on AppwriteException {
      rethrow;
    }
  }
}
Just read the comments between the codes and I am sure you won’t feel overwhelmed with it.
This deals with creating new Chat collections between 2 users. Now let’s integrate this function in user_list_page.dart . We had our UI that looks something like this. Now all we need is to add the functionality when we click a particular user tile.
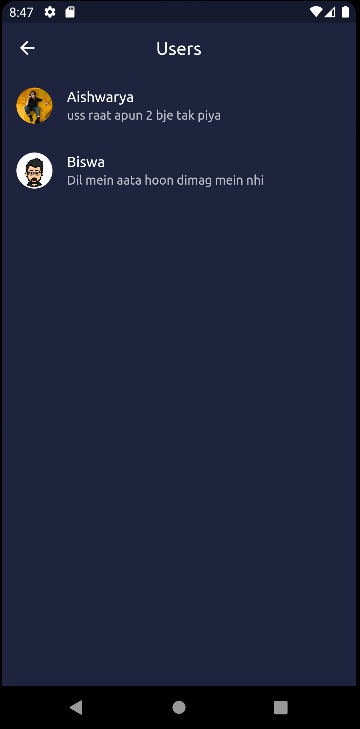
Let’s Add the function
    /// Manage onTap function for each user
    ///
    /// So what it does, if the user taps on the tile it opens the [ChatPage]
    void _onTap(String userId, NoSignalUser user) async {
      final id = await ref
          .watch(serverProvider)
          .createConversation(curUser!.id, userId);
      Navigator.of(context).push(MaterialPageRoute(
          builder: (context) => ChatPage(
                collectionId: id!,
                chatUser: user,
              )));
    }
This is the _onTap function which we needed. This will call the createConversation function and create the new collection(if needed) and redirect you to ChatPage . Ofc, its all provided by the serverProvider . Let’s declare this provider now.
import 'package:flutter_riverpod/flutter_riverpod.dart';
import 'package:no_signal/api/database/server_api.dart';
import 'package:no_signal/providers/client.dart';

/// Provider for accessing [ServerApi] functions
final serverProvider = Provider<ServerApi>((ref) {
  return ServerApi(ref.watch(dartclientProvider));
});
That’s it, you are half way done in completing your chat app.
Let’s see how it goes
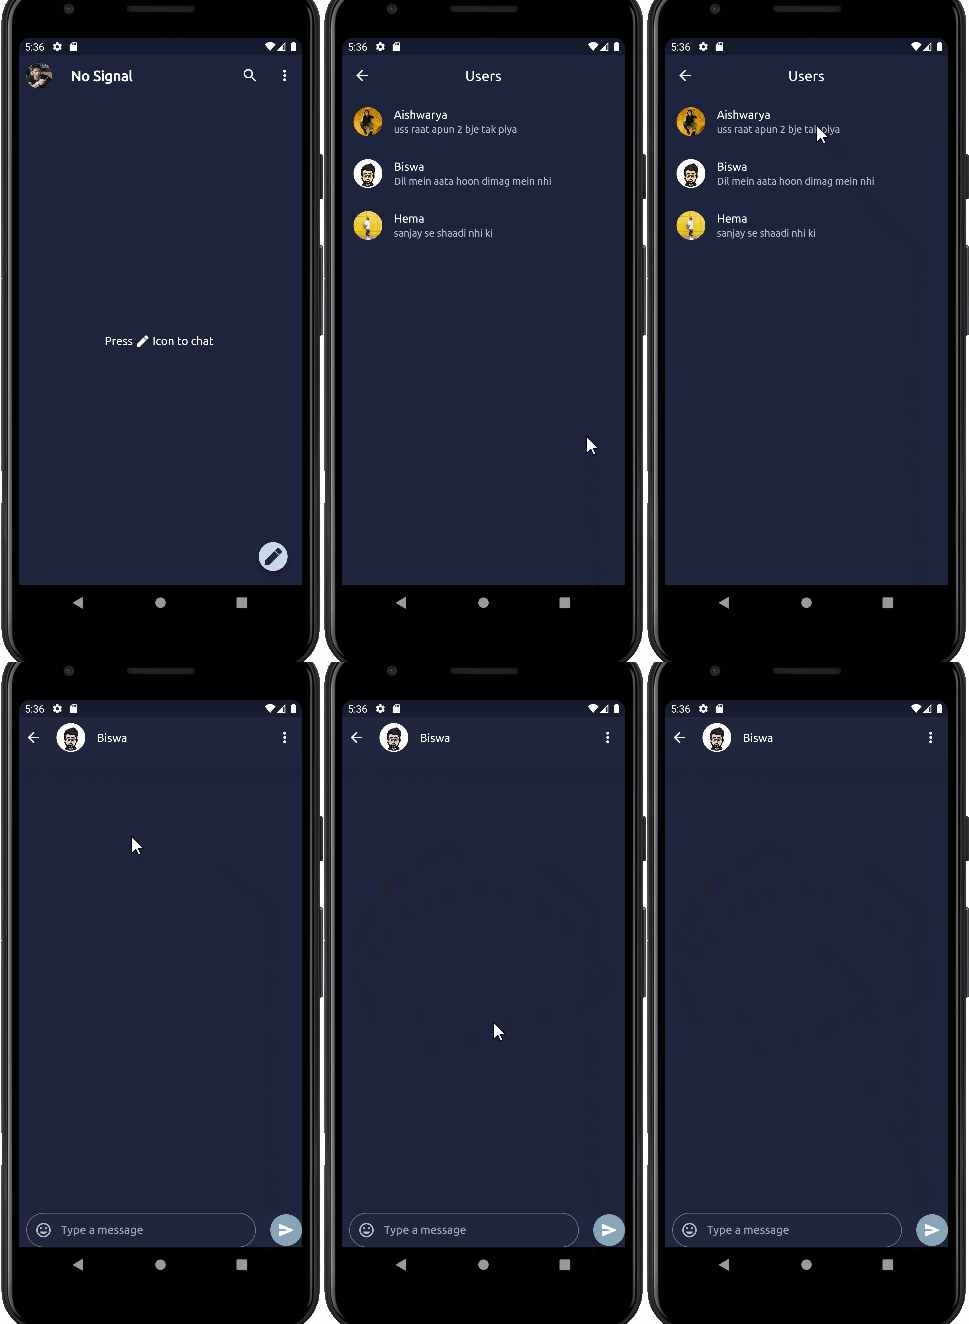
Let’s look at the console
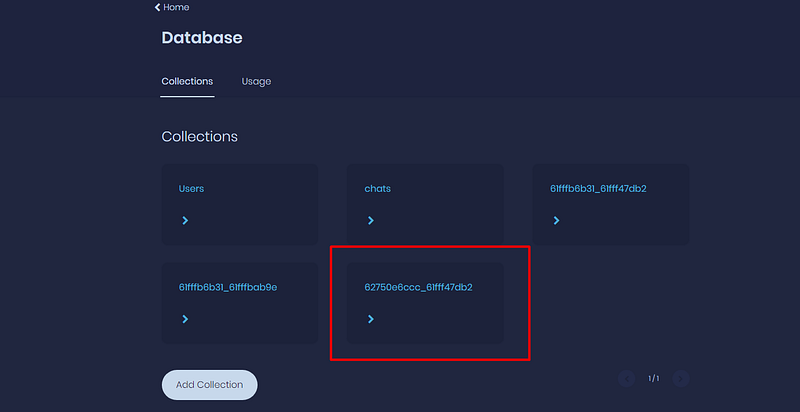
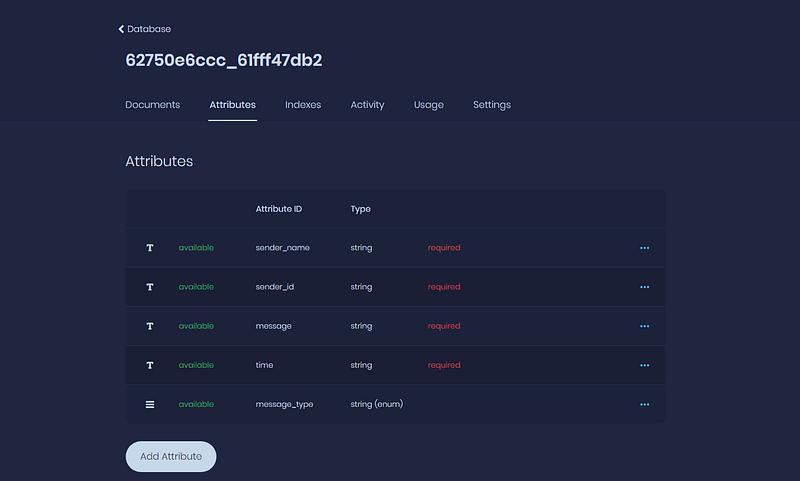
An empty collection with following attributes defined. So yess, so far everything is working now.
Time for some gifs spams


Okay, let’s get back on track now. So, creating a new collection works perfectly. Now all we need is to send and receive messages from the user.
Let’s talk about chat_services.dart . This file contains code about managing all the logic for the chat services. Have a look and I am sure it would be pretty self explanatory to you.
import 'dart:developer';

import 'package:appwrite/appwrite.dart';
import 'package:appwrite/models.dart';
import 'package:flutter/material.dart';
import 'package:flutter_chat_bubble/bubble_type.dart';
import 'package:flutter_chat_bubble/chat_bubble.dart';
import 'package:flutter_chat_bubble/clippers/chat_bubble_clipper_1.dart';
import 'package:flutter_riverpod/flutter_riverpod.dart';
import 'package:no_signal/models/chat.dart';
import 'package:no_signal/models/user.dart';

import '../../themes.dart';

/// [ChatServicesNotifier]
/// The services neccessary to work with the [Chat] model.
/// These are all the services for client Side.
/// Since its a State Notifier it will notify if something changes
/// In Riverpod, no need to call `notifyListeners()`
/// Just use [state] to update the state and it will be updated automatically
class ChatServicesNotifier extends StateNotifier<List<ChatBubble>> {
  final Client client;
  final String collectionId;
  late final Database database;
  late final Account account;
  late final Realtime realtime;
  late RealtimeSubscription subscription;

  /// The List of [Chat]s fetched for the particular collection
  final List<Chat> _chats = [];

  /// Current LoggedIn [User] to be obtained from Constructor
  final NoSignalUser? user;

  /// getter for _chats
  List<Chat> get chats => _chats;

  /// Private Function for parsing [Chat] data to [ChatBubble]
  ChatBubble _parseChat(Chat chat) {
    return ChatBubble(
      margin: const EdgeInsets.only(top: 10),
      child: Text(chat.message),
      alignment:
          user!.id == chat.senderid ? Alignment.topRight : Alignment.topLeft,
      shadowColor: Colors.transparent,
      backGroundColor: user!.id != chat.senderid
          ? Colors.grey
          : NoSignalTheme.lightBlueShade,
      clipper: ChatBubbleClipper1(
          type: user!.id == chat.senderid
              ? BubbleType.sendBubble
              : BubbleType.receiverBubble),
    );
  }

  /// Constructor
  ChatServicesNotifier(
      {required this.client, this.user, required this.collectionId})
      : super([]) {
    database = Database(client);
    account = Account(client);
    realtime = Realtime(client);
    subscription = realtime.subscribe(['collections.$collectionId.documents']);
    _getOldMessages(user);
    _getRealtimeMessages();
  }

  /// Send a new message to the user.
  /// Will update the function to add support for other multimedia
  ///
  Future<void> sendMessage(Chat chat) async {
    try {
      await database.createDocument(
        collectionId: collectionId,
        documentId: 'unique()',
        data: chat.toMap(),
      );
    } catch (e) {
      rethrow;
    }
  }

  /// Function to receive the old messages from the database.
  /// This will be a one time call for this function.
  ///
  /// It will update the of [state] - List<ChatBubbles>
  /// Since its not required outside of this class,
  /// it is private
  void _getOldMessages(NoSignalUser? user) async {
    try {
      final DocumentList temp =
          await database.listDocuments(collectionId: collectionId);
      final response = temp.documents;

      /// Adding the List of [Chat]s to the [_chats]
      for (var element in response) {
        _chats.add(Chat.fromMap(element.data));
      }

      /// Updating the [state]
      /// NOTE: Don't update state by calling List methods like `add()`
      /// This does not actually modify the state.
      /// Update the state as below when you want to completely modify the list
      /// or use [...state, newState] to add a new element to the existing list
      /// Using any of the List methods will not trigger rebuilds
      state = _chats.map((e) => _parseChat(e)).toList();
    } on AppwriteException catch (_) {
      rethrow;
    }
  }

  /// [_getRealtimeMessages]
  ///
  /// A realtime function to receive new messages from the database.
  /// Appwrite Realtime API only notifies new document changes in the collection.
  /// So we would need to listen to the collection and get the new messages.
  /// That's why we made a function to [getOldMessages].
  void _getRealtimeMessages() {
    subscription.stream.listen((chat) {
      Chat data = Chat.fromMap(chat.payload);
      _chats.add(data);

      /// Note: We used spread operator to keep the existing state as well as
      /// add the new element to the list.
      /// This will trigger a rebuild of the widget.
      state = [...state, _parseChat(data)];
    });
  }

  /// [closeStream]
  ///
  /// Close the realtime stream
  /// Will be called when the user backs from chat Screen
  /// Closing the stream to avoid memory leaks and unnecessary calls
  @override
  void dispose() {
    subscription.close();
    log('Stream Closed');
    super.dispose();
  }
}
Oh Yeah!, we also used a new package here called flutter_chat_bubble . Just add this dependency in you pubspec.yaml file.
dependencies:
  flutter_chat_bubble: ^2.0.0
More about this package and how to use it

Now there are two new things in this code we need to talk about. One is StateNotifier and the other Realtime .
StateNotifier is an observable class that stores a single immutable state from the riverpod package.
It can be used as a drop-in replacement to ChangeNotifier or other equivalent objects like Bloc. Its particularity is that it tries to be simple, yet promote immutable data.
By using immutable state, it becomes a lot simpler to:
- compare previous and new state
- implement undo-redo mechanism
- debug the application state
Realtime class is from the appwrite SDK. Realtime allows you to listen to any events on the server-side in realtime using the subscribe method.
Instead of requesting new data via HTTP, the subscription will receive new data every time it changes, any connected client receives that update within milliseconds via a WebSocket connection.
To know more about Realtime
Now, let’s create a StateNotifierProvider for the chat services which would notify all the changes and invoke build method if data changes.
import 'package:flutter_chat_bubble/chat_bubble.dart';
import 'package:flutter_riverpod/flutter_riverpod.dart';
import 'package:no_signal/providers/client.dart';
import 'package:no_signal/providers/user_data.dart';

import '../api/database/chat_services.dart';

/// A Provider to access the [ChatServicesNotifier]
///
/// A StateNotifierProvider is a Provider that is used to access a StateNotifier
/// NOTE: autoDispose and family method are also used here.
/// autoDispose: When the widget is removed from the tree, the provider will be disposed.
/// It will happen when you close the chat screen with a particular user. If autodispose
/// didn't called then redudant data will be fetched.
///
/// family: This is used to group the providers.
/// This will be used to take a live paramter when this provider is called
/// currently we are using it to get the collection id (chat id) so to fetch
/// the old chats and establish a connection between it.
final chatProvider = StateNotifierProvider.autoDispose
    .family<ChatServicesNotifier, List<ChatBubble>, String>(
        (ref, collectionId) {
  return ChatServicesNotifier(
      client: ref.watch(clientProvider),
      collectionId: collectionId,
      user: ref.watch(currentLoggedUserProvider));
});
And let’s create a Chat page UI and connect everything.
import 'package:flutter/material.dart';
import 'package:flutter_riverpod/flutter_riverpod.dart';
import 'package:no_signal/models/user.dart';
import 'package:no_signal/providers/chat.dart';
import 'package:no_signal/providers/user_data.dart';
import 'package:no_signal/themes.dart';
import 'package:no_signal/widgets/send_message.dart';

import '../../models/chat.dart';

/// [ChatPage]
///
/// This is the chat page.
class ChatPage extends ConsumerWidget {
  /// CollectionId for the current convo
  final String collectionId;

  /// Data of the user whom the current user is chatting with
  /// The data is required to display the name and photo of the user
  final NoSignalUser chatUser;
  ChatPage({required this.collectionId, required this.chatUser, Key? key})
      : super(key: key);

  /// TextFieldController for the message input
  final TextEditingController _textController = TextEditingController();

  @override
  Widget build(BuildContext context, WidgetRef ref) {
    /// Get Data for the currentLoggedInUser
    NoSignalUser? user = ref.watch(currentLoggedUserProvider);

    /// Get the list of ChatData
    final chatList = ref.watch(chatProvider(collectionId));

    Future<void> _sendMessage(String message) async {
      if (message.isEmpty) return;

      /// Parse the data into a proper model
      Chat data = Chat(
          senderName: user!.name,
          senderid: user.id,
          message: message,
          time: DateTime.now());

      try {
        /// Send the message
        await ref.watch(chatProvider(collectionId).notifier).sendMessage(data);

        /// Clear the text field after sending
        _textController.clear();
      } catch (e) {
        rethrow;
      }
    }

    return Scaffold(
      appBar: AppBar(
        leading: IconButton(
          icon: const Icon(Icons.arrow_back),
          onPressed: () {
            Navigator.of(context).pop();
          },
        ),
        backgroundColor: NoSignalTheme.navyblueshade4,
        leadingWidth: 20,
        elevation: 0,
        title: ListTile(
          leading: CircleAvatar(
            backgroundImage: MemoryImage(
              chatUser.image!,
            ),
          ),
          title: Text(chatUser.name),
        ),
        actions: [
          IconButton(
            icon: const Icon(Icons.more_vert),
            onPressed: () {},
          )
        ],
      ),
      body: Scaffold(
        body: ListView(
          children: [
            ...chatList,
          ],
        ),
        bottomNavigationBar: SendMessageWidget(
            textController: _textController,
            onSend: () async => await _sendMessage(_textController.text)),
      ),
    );
  }
}
And that’s it. We are done!!!
Let’s test it live now
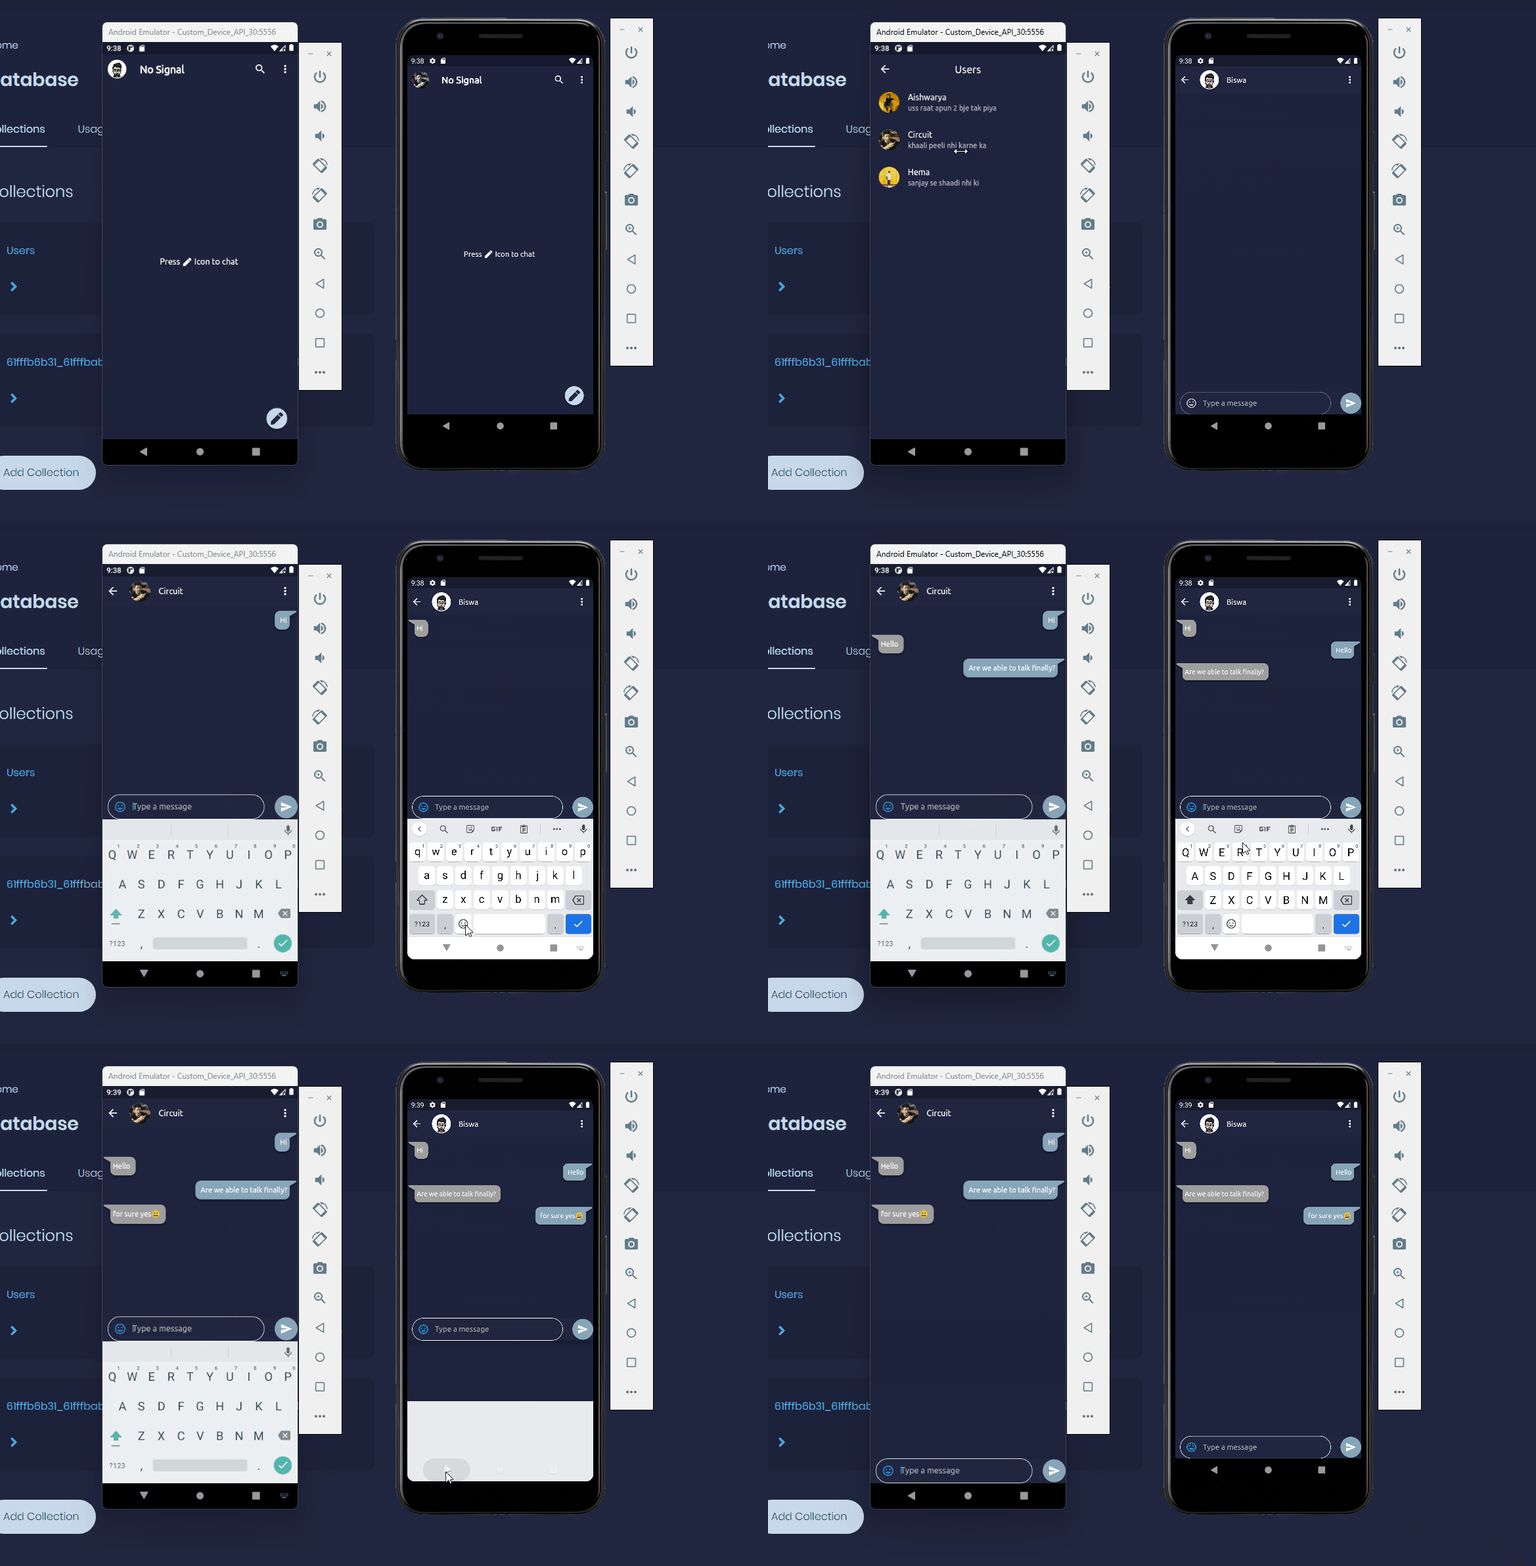
As you can see, we are finally able to talk that too in realtime.
Let’s look at the collection in the dashboard
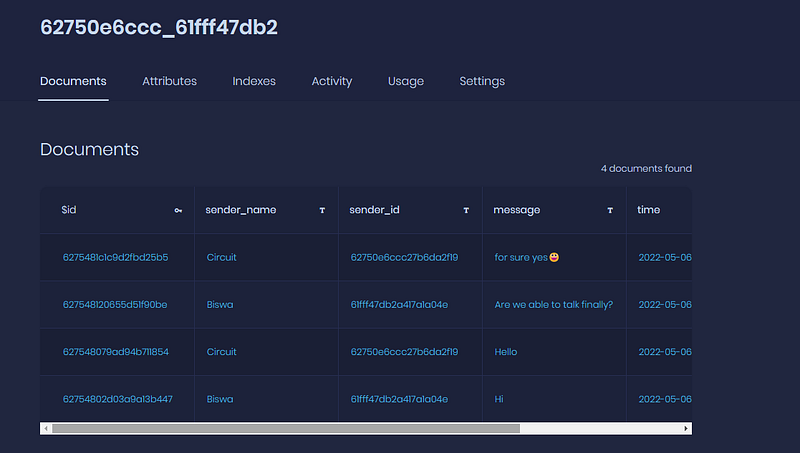
Now we can finally say, that this series has been completed successfully.
Thank you so much for being patient and reading my blogs. I didn’t hoped a lot of reactions to my previous blogs and seriously, this motivated me further to complete this series.
Here is the complete source code of the project. We haven’t coded the settings screen but that’s something for you to explore and I believe you can understand that code from the repo itself if you get stuck implementing it.
If you have any queries or just want to connect with me, here are my social handles from where you can reach to me.

Till then Stay Tuned ✨