Building No Signal App using Flutter and Appwrite
Let’s do Something creative and make a next-level Flutter App. We are going to make No Signal — A chatting app inspired by Signal. We are going to use Appwrite as backend, Riverpod as a State management solution and of course Flutter for creating beautiful apps.
Before Starting,
Appwrite! What is Appwrite?
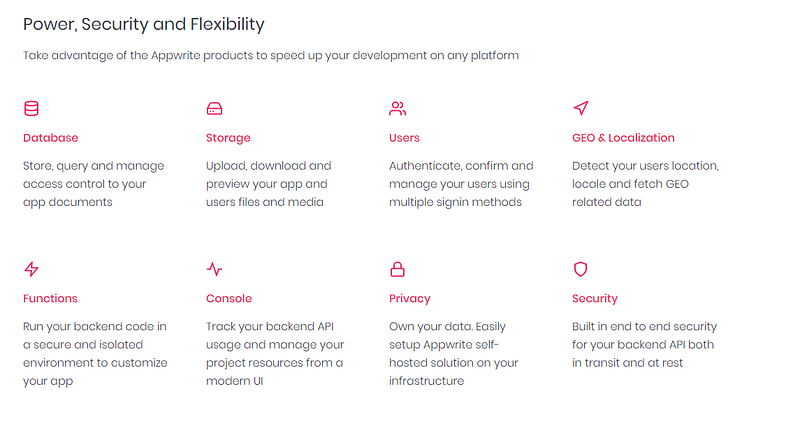
Features of Appwrite(Screenshot taken from appwrite.io)
Appwrite is a self-hosted solution that provides developers with a set of easy-to-use and integrate REST APIs to manage their core backend needs.
And the Best Part — It’s Open Source
So without a delay Let’s Get Started

But Before that let’s set up Appwrite
The easiest way to start running your Appwrite server is by running our docker-compose file. Before running the installation command make sure you have Docker installed on your machine
UNIX
docker run -it --rm \
    --volume /var/run/docker.sock:/var/run/docker.sock \
    --volume "$(pwd)"/appwrite:/usr/src/code/appwrite:rw \
    --entrypoint="install" \
    appwrite/appwrite:1.1.1
Windows
CMD
docker run -it --rm ^
    --volume //var/run/docker.sock:/var/run/docker.sock ^
    --volume "%cd%"/appwrite:/usr/src/code/appwrite:rw ^
    --entrypoint="install" ^
    appwrite/appwrite:1.1.1
PowerShell
docker run -it --rm ,
    --volume /var/run/docker.sock:/var/run/docker.sock ,
    --volume ${pwd}/appwrite:/usr/src/code/appwrite:rw ,
    --entrypoint="install" ,
appwrite/appwrite:1.1.1NOTE: If you are using WSL, write the UNIX command in your wsl terminal
When the Installation is completed, run up your Local host. For me it’s http://localhost:5000 . You can set your own custom endpoint too, but that’s something for later to talk about.
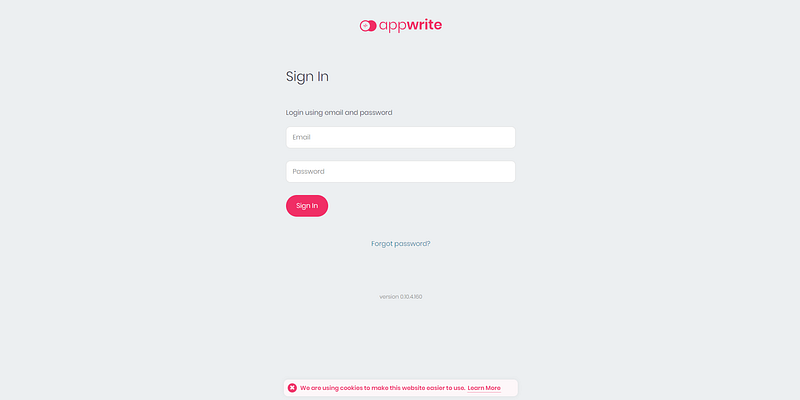
Login Page Appwrite
If you see something like this, CONGO 🎉 , you have installed Appwrite on your local machine successfully.
Now go ahead and create an account now and log in
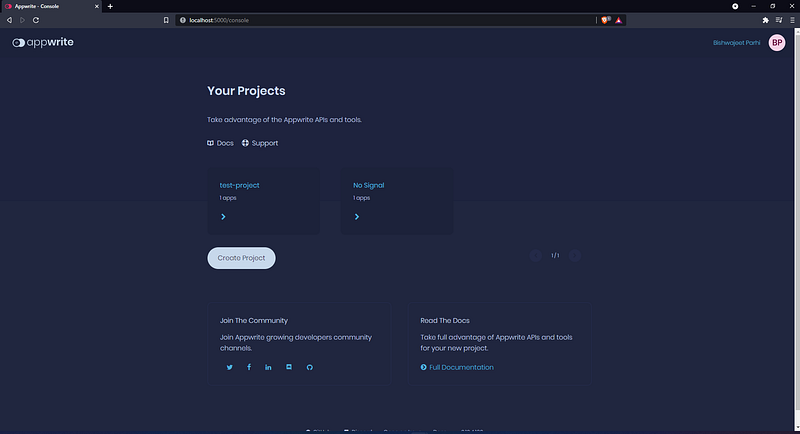
You will see something like this. Well not exactly like this — for starters, you would have light mode, no projects and will prompt you to create one but the overall layout will be like this.
Let’s go ahead and create a new Project 🚀
Click on Create Project. It’s your wish to generate the project ID or set a custom one. Just keep in mind to change it wherever necessary
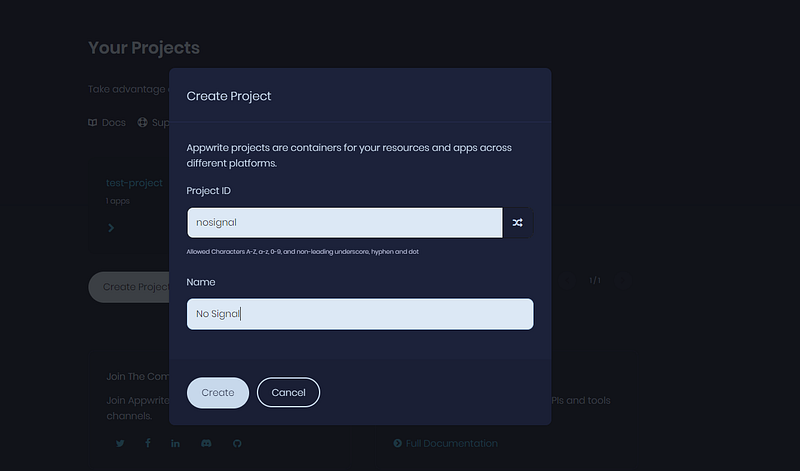
Of course, you are free to choose your own project name. For memes I am creating No Signal.
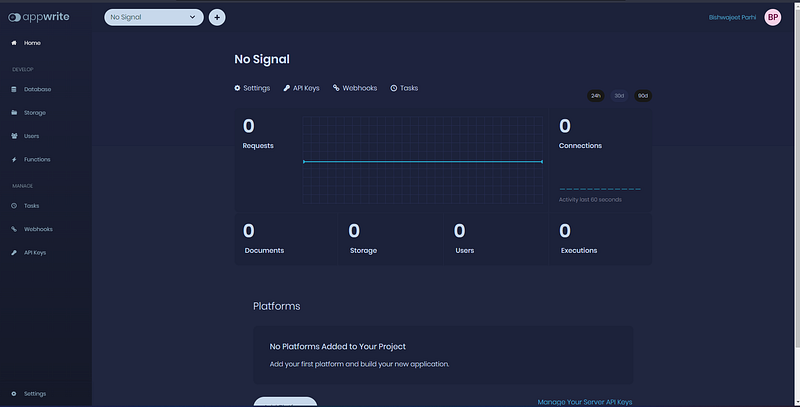
After creating a new Project, this is how the dashboard will look like. Beautiful isn’t it 😉
Now just leave it here for a second and let’s create a new Flutter Project then we will come back here again
I have seen a lot of people creating a new flutter project using Terminal. Following the same tradition let’s make one

Shoot up the Terminal and run the following commands
flutter create no_signal
cd no_signal
code .
This will create a new Flutter project and will open your default Code Editor. In my case it’s VSCode✨.
Let’s do a few more things before moving to Appwrite Dashboard.
It’s time to add Dependencies. Go to your pubspec.yaml file and add the following dependencies.
dependencies:
 appwrite: ^8.1.0
 flutter_riverpod: ^2.1.1
Don’t forget to flutter pub get 😉
To know more about Riverpod

Fun Fact 🎈
Not only Flutter Appwrite SDK. In fact, all the appwrite SDK for different platforms are made using this SDK generator.
It’s Still in beta but so Powerful. Every time I see that repo, it makes me go wow.
I would recommend everyone check that out.
Getting back to our main Goal
There are some lines you need to add in your android/app/src/main/AndroidManifest.xml
<manifest ...>
  ...
   <application ...>
      ...
<!-- Add this inside the `<application>` tag, along side the existing `<activity>` tags -->
<activity android:name="com.linusu.flutter_web_auth_2.CallbackActivity" >
<intent-filter android:label="flutter_web_auth_2">
<action android:name="android.intent.action.VIEW" />
<category android:name="android.intent.category.DEFAULT" />
<category android:name="android.intent.category.BROWSABLE" />
<data android:scheme="appwrite-callback-[PROJECT_ID]" />
</intent-filter>
</activity>
</application>
</manifest>These must be added in order to capture the Appwrite OAuth callback URL.
Now Back to Appwrite Dashboard
We need to add a platform to our project. In this case, it’s Flutter. So click on Add Platform. What you will see is this screen
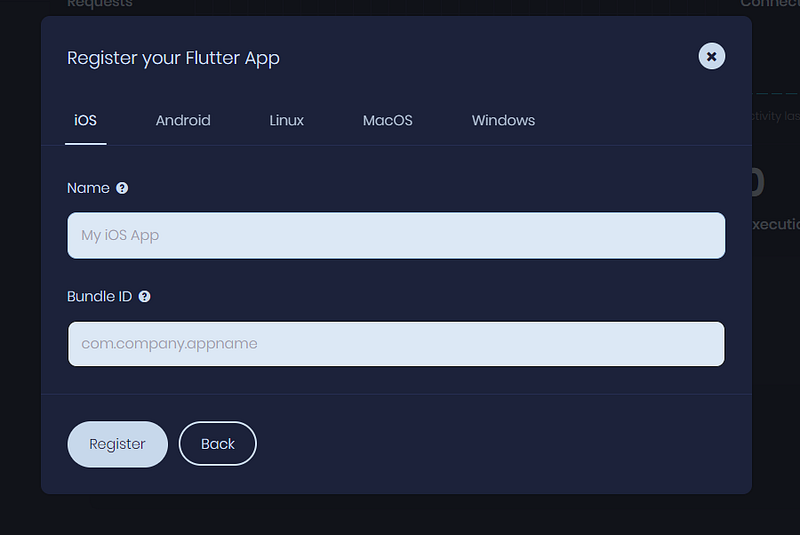
Register your Flutter App(IOS)
Now we are given 5 choices for each of the different platforms. Since I am going to make an app for android I will switch over to Android Tab. You are free to use any platform you want to develop. To check it out here’s the link
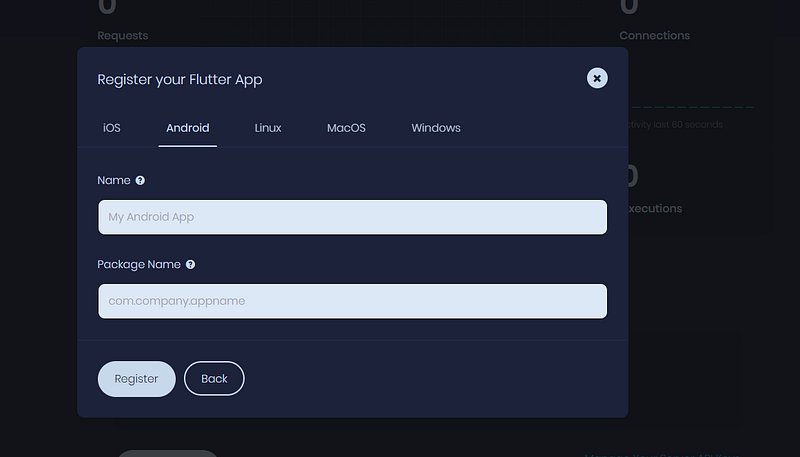
Register your Flutter App(Android)
It doesn’t expect much just two things. Your App name and Package Name. The package name can be found under android/app/build.gradle

Your App name can be the same as your project name or it can be different too. But your Package Name must be the same as the applicationId given in your build.gradle file
Congratulations🎉. You have completed the first step of setting up Appwrite and integrating with Flutter
Let’s work on some UI now
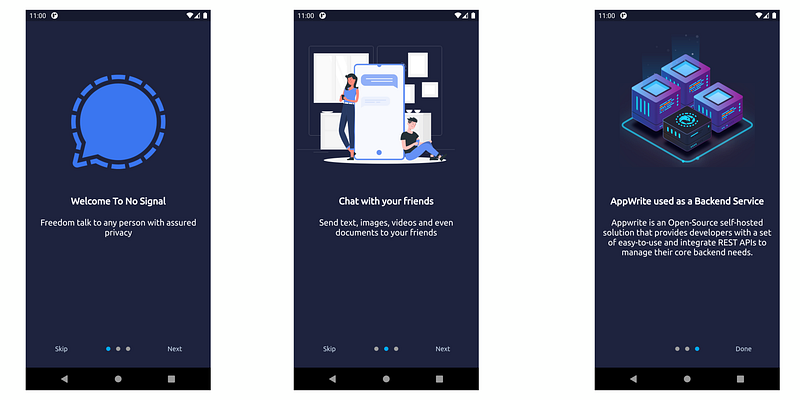
I thought of giving a brief introduction about the app and so made these screens. Don’t worry these are super easy to make. Here I have used a package called Introduction Screen and Lottie for adding lottie assets


Just add the dependencies in your pubspec.yaml as shown and run flutter pub get .
Add them beneath the existing dependencies
dependencies:
 appwrite: ^2.0.2 // don't add it again
 flutter_riverpod: ^0.14.0+3 // same for here. only for demonstration purposes
introduction_screen: ^2.1.0
lottie: ^1.2.1
Let’s look at the Welcome Screen now
import 'package:flutter/material.dart';
import 'package:introduction_screen/introduction_screen.dart';
import 'package:lottie/lottie.dart';
import 'package:no_signal/Pages/login/login_page.dart';

// I like to define elements and color in a seperate file so that's the custom themes file
import 'package:no_signal/themes.dart';

class WelcomePage extends StatelessWidget {
  const WelcomePage({Key? key}) : super(key: key);

  @override
  Widget build(BuildContext context) {
    //  Introduction Screen is actually a package that I have used from Pub.dev
    // Link for the Inroduction Screen: https://pub.dev/packages/introduction_screen

    return IntroductionScreen(
      isTopSafeArea: true, // Safe Area to avoid overlaps with the status bar
      showDoneButton: true,
      done: Text('Done', style: TextStyle(color: NoSignalTheme.whiteShade1)),

      // OnDone takes an anonymous function. So when all the slides are completed
      //we are navigating the user to Login Page
      onDone: () =>
          Navigator.of(context).pushReplacementNamed(LoginPage.routename),
      next: Text('Next', style: TextStyle(color: NoSignalTheme.whiteShade1)),

      // A skip button to skip those pages(some prefer some doesn't)
      showSkipButton: true,
      skip: Text('Skip', style: TextStyle(color: NoSignalTheme.whiteShade1)),
      showNextButton: true,

      // Same here, if the user skips - redirects to loginPage
      onSkip: () =>
          Navigator.of(context).pushReplacementNamed(LoginPage.routename),

      // Now pages expect a list of PageViewModel
      // That's what we have added here
      pages: [
        PageViewModel(
          image: Image.asset(
            'assets/images/logo.png',
            fit: BoxFit.contain,
            height: 200,
          ),
          body: "Freedom talk to any person with assured privacy",
          title: "Welcome To No Signal",
        ),
        PageViewModel(
          image: Lottie.asset("assets/lottieassets/chat.json"),
          body: "Send text, images, videos and even documents to your friends",
          title: "Chat with your friends",
        ),
        PageViewModel(
          image: Lottie.asset("assets/lottieassets/server.json"),
          body:
              "Appwrite is an Open-Source self-hosted solution that provides developers with a set of easy-to-use and integrate REST APIs to manage their core backend needs.",
          title: "AppWrite used as a Backend Service",
        ),
      ],
    );
  }
}
It was some pretty self explanatory stuffs but still tried to add some comments for better understanding.
Lemme show you my custom theme file
import 'package:flutter/material.dart';

// Flutter hex color is an external package for converting colors starting with #
// to 0xFFFFFF format.
// You need to add it to your pubspec.yaml file.
import 'package:flutter_hex_color/flutter_hex_color.dart';

// google fonts is an external package. you need to add it to your pubspec.yaml file
import 'package:google_fonts/google_fonts.dart';

class NoSignalTheme {
  static ThemeData lightTheme() => ThemeData(
        brightness: Brightness.light,
        fontFamily: GoogleFonts.ubuntu().fontFamily,
        //  Will Work on LightTheme in later Future
        // Initally when thought about creating this app, I only thought about dark theme.
      );

  static ThemeData darkTheme() => ThemeData(
        brightness: Brightness.dark,
        scaffoldBackgroundColor: navyblueshade2,
        fontFamily: GoogleFonts.ubuntu().fontFamily,
        iconTheme: const IconThemeData(color: Colors.white),
        // ignore: deprecated_member_use
        accentColor: navyblueshade3,
        appBarTheme: AppBarTheme(
          backgroundColor: navyblueshade2,
          iconTheme: const IconThemeData(color: Colors.white),
          actionsIconTheme: const IconThemeData(color: Colors.white),
        ),
        bottomAppBarTheme: BottomAppBarTheme(
          color: navyblueshade4,
        ),
      );

  //  Color Codes for Dark Theme
  static Color navyblueshade1 = HexColor('#1C223A');
  static Color navyblueshade2 = HexColor('#1E233E');
  static Color navyblueshade3 = HexColor('#161A2C');
  static Color navyblueshade4 = HexColor('#20263F');
  static Color whiteShade1 = HexColor('#C7D8EB');
  static Color lightBlueShade = HexColor('#87A5B9');
}
Now we have worked on Introduction Screen, how about Login UI now? We will be making something like this
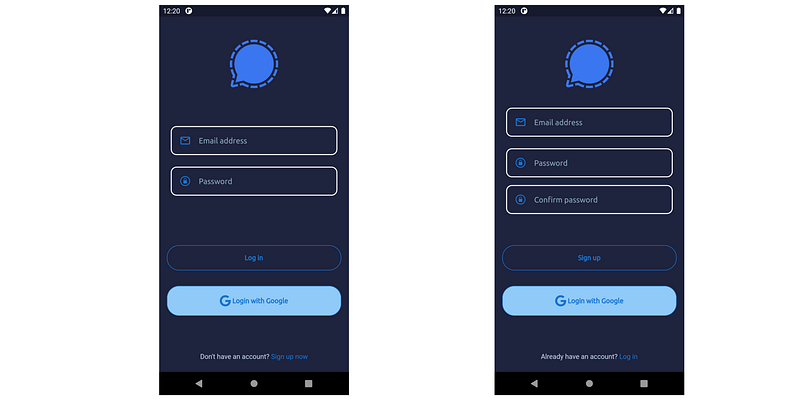
In this upcoming gist, I would be implementing Riverpod too. Follow the comments and I am sure you won’t get stuck.
import 'package:flutter/cupertino.dart';
import 'package:flutter/gestures.dart';
import 'package:flutter/material.dart';
import 'package:flutter_riverpod/flutter_riverpod.dart';
import 'package:font_awesome_flutter/font_awesome_flutter.dart';
import 'package:no_signal/api/auth/authentication.dart';
import 'package:no_signal/providers/auth.dart';
import 'package:no_signal/themes.dart';
// Instead of creating Two Screens, I have Added both Login and Signup Screen in one Screen
// Yes , I am Lazy , But I am not going to create two screens , I am going to create one screen
// So for to monitor we are in which State we are i.e Login or signUp , I have used enums here
// So I have created and Enum Status which contains two things Login and SignUp
// and I have made a Global Variable type of Status, to use in LoginPage
// It's actually not recommended to use Global Variables , but I am using it here to make it simple
enum Status {
login,
signUp,
}
Status type = Status.login;
/// I have used [ConsumerStatefulWidget] to use [setState] functions in [LoginPage]
/// and declare the providers outside the [build] method
/// we could also have managed the state using Riverpod but I am not using it here
/// Remember Stateful widgets are made for a reason. If it would be bad
/// Flutter developers would not think of it in the first place.
class LoginPage extends ConsumerStatefulWidget {
static const routename = '/LoginPage';
const LoginPage({Key? key}) : super(key: key);
@override
ConsumerState<ConsumerStatefulWidget> createState() => _LoginPageState();
}
class _LoginPageState extends ConsumerState<LoginPage> {
/// [GlobalKey] is used to validate the [Form] and managing the state of the form
final GlobalKey<FormState> _formKey = GlobalKey();
/// [TextEditingController] to get the data from the TextFields
/// we can also use Riverpod to manage the state of the TextFields
/// but again I am not using it here
final _email = TextEditingController();
final _password = TextEditingController();
/// A loading variable to show the loading animation when you a function is ongoing
bool _isLoading = false;
/// This function is used to show a spinning Indicator when the function is ongoing
void _loading() {
setState(() {
_isLoading = !_isLoading;
});
}
/// This function is used to switch type - Login or SignUp
void _switchType() {
if (type == Status.signUp) {
setState(() {
type = Status.login;
});
} else {
setState(() {
type = Status.signUp;
});
}
// log('$type');
}
// Consuming a provider using watch method and storing it in a variable
// Now we will use this variable to access all the functions of the
// authentication
// I will show these providers in the upcoming gist
late final Authentication auth = ref.watch(authProvider);
// The above provider is used to access authentication class
// Instead of creating a clutter on the onPressed Function
// I have decided to create a seperate function and pass them into the
// respective parameters.
// if you want you can write the exact code in the onPressed function
// it all depends on personal preference and code readability
Future<void> _onPressedFunction() async {
if (!_formKey.currentState!.validate()) {
return;
}
_loading();
if (type == Status.login) {
await auth.login(_email.text, _password.text, context);
} else {
await auth.signUp(_email.text, _password.text, context);
}
_loading();
}
@override
void dispose() {
_email.dispose();
_password.dispose();
super.dispose();
}
@override
Widget build(BuildContext context) {
return Scaffold(
resizeToAvoidBottomInset: false,
body: SafeArea(
child: Form(
key: _formKey,
child: Column(
children: [
Expanded(
flex: 3,
child: Container(
margin: const EdgeInsets.only(top: 48),
child: Column(
mainAxisAlignment: MainAxisAlignment.start,
crossAxisAlignment: CrossAxisAlignment.start,
children: [
Center(
child: Image.asset(
'assets/images/logo.png',
height: 100,
)),
const Spacer(flex: 1),
Container(
margin: const EdgeInsets.symmetric(
horizontal: 24, vertical: 16),
padding: const EdgeInsets.symmetric(
horizontal: 16, vertical: 4),
decoration: BoxDecoration(
// color: Colors.white,
border: Border.all(width: 2, color: Colors.white),
borderRadius: BorderRadius.circular(12)),
child: TextFormField(
controller: _email,
autocorrect: true,
enableSuggestions: true,
keyboardType: TextInputType.emailAddress,
decoration: InputDecoration(
hintText: 'Email address',
hintStyle:
TextStyle(color: NoSignalTheme.lightBlueShade),
icon: Icon(Icons.email_outlined,
color: Colors.blue.shade700, size: 24),
alignLabelWithHint: true,
border: InputBorder.none,
),
// Our little validator to check things out
validator: (value) {
if (value!.isEmpty || !value.contains('@')) {
return 'Invalid email!';
}
return null;
},
),
),
Container(
margin: const EdgeInsets.symmetric(
horizontal: 24, vertical: 8),
padding: const EdgeInsets.symmetric(
horizontal: 16, vertical: 4),
decoration: BoxDecoration(
border: Border.all(width: 2, color: Colors.white),
borderRadius: BorderRadius.circular(12)),
child: TextFormField(
controller: _password,
obscureText: true,
validator: (value) {
if (value!.isEmpty || value.length < 8) {
return 'Password is too short!';
}
return null;
},
decoration: InputDecoration(
hintText: 'Password',
hintStyle:
TextStyle(color: NoSignalTheme.lightBlueShade),
icon: Icon(CupertinoIcons.lock_circle,
color: Colors.blue.shade700, size: 24),
alignLabelWithHint: true,
border: InputBorder.none,
),
),
),
if (type == Status.signUp)
AnimatedContainer(
duration: const Duration(milliseconds: 600),
margin: const EdgeInsets.symmetric(
horizontal: 24, vertical: 8),
padding: const EdgeInsets.symmetric(
horizontal: 16, vertical: 4),
decoration: BoxDecoration(
border: Border.all(width: 2, color: Colors.white),
borderRadius: BorderRadius.circular(12)),
child: TextFormField(
obscureText: true,
decoration: InputDecoration(
hintText: 'Confirm password',
hintStyle: TextStyle(
color: NoSignalTheme.lightBlueShade),
icon: Icon(CupertinoIcons.lock_circle,
color: Colors.blue.shade700, size: 24),
alignLabelWithHint: true,
border: InputBorder.none,
),
validator: type == Status.signUp
? (value) {
if (value != _password.text) {
return 'Passwords do not match!';
}
return null;
}
: null,
),
),
const Spacer(),
],
),
),
),
Expanded(
flex: 2,
child: SizedBox(
width: double.infinity,
child: Column(
mainAxisAlignment: MainAxisAlignment.spaceAround,
crossAxisAlignment: CrossAxisAlignment.center,
children: [
Container(
padding: const EdgeInsets.only(top: 32.0),
margin: const EdgeInsets.symmetric(horizontal: 16),
width: double.infinity,
child: _isLoading
? const Center(child: CircularProgressIndicator())
: MaterialButton(
onPressed: _onPressedFunction,
child: Text(
type == Status.login ? 'Log in' : 'Sign up',
style: const TextStyle(
fontWeight: FontWeight.w600),
),
textColor: Colors.blue.shade700,
textTheme: ButtonTextTheme.primary,
minWidth: 100,
padding: const EdgeInsets.all(18),
shape: RoundedRectangleBorder(
borderRadius: BorderRadius.circular(25),
side:
BorderSide(color: Colors.blue.shade700),
),
),
),
Container(
padding: const EdgeInsets.only(top: 32.0),
margin: const EdgeInsets.symmetric(horizontal: 16),
width: double.infinity,
child: MaterialButton(
onPressed: () {
ScaffoldMessenger.of(context).showMaterialBanner(
MaterialBanner(
backgroundColor:
NoSignalTheme.lightBlueShade,
padding: const EdgeInsets.only(top: 16),
// Don't mind these comments,
// I wrote them for memes
content: const Text(
'Gimme Credit Card and I will give you Google Authentication'),
actions: [
TextButton(
onPressed: () {
ScaffoldMessenger.of(context)
.clearMaterialBanners();
},
child: const Text('Haha Noob Lol'))
]));
},
child: Row(
mainAxisAlignment: MainAxisAlignment.center,
children: const [
// A google icon here
// an External Package used here
// Font_awesome_flutter package used
// Also Google function not implemented
// I like to have it as a button and will
// add someday in the future
FaIcon(FontAwesomeIcons.google),
Text(
' Login with Google',
style: TextStyle(fontWeight: FontWeight.w600),
),
],
),
color: Colors.blue.shade200,
textColor: Colors.blue.shade700,
textTheme: ButtonTextTheme.primary,
minWidth: 100,
padding: const EdgeInsets.all(18),
shape: RoundedRectangleBorder(
borderRadius: BorderRadius.circular(25),
side: BorderSide(color: Colors.blue.shade700),
),
),
),
const Spacer(),
Padding(
padding: const EdgeInsets.only(bottom: 24.0),
child: RichText(
text: TextSpan(
text: type == Status.login
? 'Don\'t have an account? '
: 'Already have an account? ',
style:
TextStyle(color: NoSignalTheme.whiteShade1),
children: [
TextSpan(
text: type == Status.login
? 'Sign up now'
: 'Log in',
style:
TextStyle(color: Colors.blue.shade700),
recognizer: TapGestureRecognizer()
..onTap = () {
_switchType();
})
],
),
),
),
],
)),
)
],
),
),
),
);
}
}It’s quite long but have patient and the most important thing, don’t get overwhelmed. Read it at your own pace and you will find it easy.
This completes the UI part. If you want a little more explanation about how Riverpod authentication work, read this article by me
I have explained a bit more about Riverpod here.
Moving On, there are lots of providers I have created that you do not know about it yet. Let’s Discuss it but before that let’s implement Authentication class and communicate with appwrite
import 'dart:developer';

import 'package:appwrite/appwrite.dart';
import 'package:appwrite/models.dart';
import 'package:flutter/material.dart';
import 'package:no_signal/pages/home/home_page.dart';
import 'package:no_signal/pages/login/create_profile.dart';
import 'package:no_signal/pages/login/login_page.dart';

///  We have created a class named [Authentication] which contains all
///  the methods that we need to perform the authentication process.
///  ofc You are free to use any name you want
class Authentication {
  ///  [Client] is a class provided by the Appwrite SDK.
  ///  It is used to communicate with the Appwrite API.
  ///  We will be receiving this object from the constructor
  final Client client;

  ///  [Account] is also a class provided by the Appwrite SDK.
  ///  It is to access the all the account related methods. like get account
  ///  or create account , update account etc
  late Account account;
  //  late keyowrd due to Null Safety
  //  to know more about Null Safety visit https://dart.dev/null-safety/understanding-null-safety

  //  We have created a constructor which will initialize the account object
  //  Account class requires an object of Client.
  //  I have decided to make a client object in the provider itself so you will
  // see that soon
  Authentication(this.client) {
    account = Account(client);
  }

  //  Time for some functions now
  //  Since all the functions will be asynchronous we will be using Future
  //  cause you know there is a future involved. you don't know what are you expecting

  //  In older version appwrite SDK 1.0.2 , we used to get response as the output
  //  and we had to manually add them into our custom models.
  //  But fear not we are using the latest appwrite sdk version 2.0.2
  //  This returns proper models so yup, it made your life a little easier.
  //  When I started this project I had manually implemented those models
  //  But this blog uses latest version of appwrite so we are going to skip that part

  ///  This is a function [getAccount] which will return a [User] object containing the data
  ///  of the user if the user is authenticated. Otherwise it will throw an exception
  ///  SO we don't want the program to stop in between so we are returning NULL if
  ///  it throws exception

  ///  To know more about User Model `Ctrl+click` or `command + click`
  ///  on User to go to the User model
  ///  It's a nice practice to see these stuffs and explore them
  Future<User?> getAccount() async {
    try {
      return await account.get();
    } on AppwriteException catch (e) {
      log(e.toString());
      return null;
    }
  }

  // A function to login the user with email and password
  Future<void> login(
      String email, String password, BuildContext context) async {
    try {
      ///  here account is the object of Account class and create session
      ///  is a method of Account class which signs in the current user.
      ///  We are using try catch block so that if there is any error we can
      ///  show the user a proper message
      ///  if the try is successful we would be actually checking which type of
      ///  data we are receving from the server
      ///  if you don't want to see you can comment it out.
      ///  nevermind I did that for you😉
      /// var data = await account.createSession(email: email, password: password);
      await account.createSession(email: email, password: password);

      await Navigator.pushReplacementNamed(context, HomePage.routename);
    } catch (e) {
      // print(e);
      await showDialog(
          context: context,
          builder: (BuildContext context) => AlertDialog(
                title: const Text('Error Occured'),
                content: Text(e.toString()),
                actions: [
                  TextButton(
                      onPressed: () {
                        Navigator.of(context).pop();
                      },
                      child: const Text("Ok"))
                ],
              ));
    }
  }

  ///  A function to signup the user with email and password
  Future<void> signUp(
      String email, String password, BuildContext context) async {
    try {
      //  In this create method is used to signup the user using
      //  email and password
      //  keep in mind it only registers a user and doesn't signin
      //  So you need to signin after registration
      //  in That case what I did if the function is successful
      //  I try to signIn using .whenComplete()
      //  this is a function provided by the Future class
      //  to perform an operation when its completed
      await account.create(
          email: email, password: password, userId: 'unique()');
      // We will creating a userId as the email id(UNIQUE)

      await account.createSession(email: email, password: password);

      await Navigator.pushReplacementNamed(
          context, CreateAccountPage.routeName);
    } catch (e) {
      log(" Sign Up $e");
      await showDialog(
          context: context,
          builder: (BuildContext context) => AlertDialog(
                title: const Text('Error Occured'),
                content: Text(e.toString()),
                actions: [
                  TextButton(
                      onPressed: () {
                        Navigator.of(context).pop();
                      },
                      child: const Text("Ok"))
                ],
              ));
    }
  }

  ///  A function to logout the current user
  Future<void> logout(BuildContext context) async {
    try {
      ///  Delete session is the method to logout the user
      ///  it expects sessionID but by passing 'current' it redirects to
      ///  current loggedIn user in this application
      await account.deleteSession(sessionId: 'current');
      ScaffoldMessenger.of(context).showSnackBar(const SnackBar(
        content: Text("Logged out Successfully"),
        duration: Duration(seconds: 2),
      ));
      await Navigator.of(context).pushReplacementNamed(LoginPage.routename);
    } catch (e) {
      // print(e);
      await showDialog(
          context: context,
          builder: (BuildContext context) => AlertDialog(
                title: const Text('Something went wrong'),
                content: Text(e.toString()),
                actions: [
                  TextButton(
                      onPressed: () {
                        Navigator.of(context).pop();
                      },
                      child: const Text("Ok"))
                ],
              ));
    }
  }
}
Just go through those comments and I am sure you would be able to understand all of it. If you want to know more about any methods, hop into appwrite docs Account section and you will find everything.
And That’s it we made Authentication Class, we made some beautiful UI’s. Now the only thing left is to create Providers and connect everything.
Also Thanks for reading till here, I know this blog got a little bit long so I am gonna keep it till Authentication. In the next blog I would be implementing some more UI’s and Implementing the Chat Model
Let’s check out what User Model actually is and what appwrite actually provides to us
User Model
// NOTE: This has been taken from official Flutter appwrite SDK

class User {
  /// User ID.
  final String $id;

  /// User name.
  final String name;

  /// User registration date in Unix timestamp.
  final int registration;

  /// User status. 0 for Unactivated, 1 for active and 2 is blocked.
  final int status;

  /// Unix timestamp of the most recent password update
  final int passwordUpdate;

  /// User email address.
  final String email;

  /// Email verification status.
  final bool emailVerification;

  /// User preferences as a key-value object
  final Preferences prefs;

  User({
    required this.$id,
    required this.name,
    required this.registration,
    required this.status,
    required this.passwordUpdate,
    required this.email,
    required this.emailVerification,
    required this.prefs,
  });

  factory User.fromMap(Map<String, dynamic> map) {
    return User(
      $id: map['\$id'],
      name: map['name'],
      registration: map['registration'],
      status: map['status'],
      passwordUpdate: map['passwordUpdate'],
      email: map['email'],
      emailVerification: map['emailVerification'],

    // Here preference is actually a different class model. This is left
    // as an exercise for you to discover. The more you discover, the more
    // interesting it gets
      prefs: Preferences.fromMap(map['prefs']),
    );
  }

  Map<String, dynamic> toMap() {
    return {
      "\$id": $id,
      "name": name,
      "registration": registration,
      "status": status,
      "passwordUpdate": passwordUpdate,
      "email": email,
      "emailVerification": emailVerification,
      "prefs": prefs.toMap(),
    };
  }
}
Let’s Look at some Providers now
For simplicity, I have created 2 files — Client Provider and Auth Provider so to keep things in a better place
Client Provider
import 'package:appwrite/appwrite.dart';
import 'package:flutter_riverpod/flutter_riverpod.dart';

//  So this is the most important step. Otherwise everystep you done - you would be
//  Thinking that it's waste

//  So I have created a client provider which returns a client object. Here ref is
//  something that if you want to consume another provider inside provider
//  Don't worrry its optional but I will show you one example where you can use it

//  getting back to CLient. So main things that you need  is the endpoint
//  projectId and selfsignedStatus (defaults to false)

//  About this endpoint remeber this is different for everyone and localhost
//  does not work in emulators and phone devices.
//  So how to get this address?
//  Goto your terminal and type
//  ipconfig
//  and copy the ipv4 address (in my case it was Wireless Lan WiFi, yours could
//  ethernet too)
//then suffix it with the portnumber

//  Okay if you are unsure that thing you copied is right or wrong
// here's a small tip to debug
//  If I were you I would goto my phone's browser and type the custom Endpoint
//  in the url bar and see if it works.
//  if you get a signIn panel then voila it works. Now DON'T TOUCH IT.


final clientProvider = Provider<Client>((ref) {
  return Client()
      .setEndpoint('http://192.168.1.26:5000/v1') // Your Appwrite Endpoint
      .setProject('nosignal') // Your project ID
      .setSelfSigned(status: true);  // For self signed certificates, only use for development
});
Don’t worry it’s just a one-liner code. My Comments just made this file look big😄
Auth Provider
import 'package:appwrite/models.dart';
import 'package:flutter_riverpod/flutter_riverpod.dart';
import 'package:no_signal/providers/client.dart';

import '../api/auth/authentication.dart';

//  So this is where we defined auth providers

//  Let's have a look at authProvider
//  you will notice I am consuming another provider within a provider
//  and its totally ok, there aren't performance issues to this
//  this authProvider provides an Object of class Authentication
final authProvider = Provider<Authentication>((ref) {
  return Authentication(ref.watch(clientProvider));
});

///  This is a future Provider which ofc involves a future
///  we are accessing getAccount here which will either return a User object
///  if it's logged In and null if it's not
final userProvider = FutureProvider<User?>((ref) async {
  return ref.watch(authProvider).getAccount();
});

/// This is a state provider which is a bit different from the other providers
///  So this  is a provider which decides which widget to show, either welcome screen
///  or Home Screen
///  so think of this like a switch. If the user is logged in show one screen
///  otherwise show other screen
/// When the state changes the widget is rebuilt automatically
///  Keep it null so that we would be able to show the loading screen
final userLoggedInProvider = StateProvider<bool?>((ref) {
  return null;
});
Finally, Let’s look at Main.dart file now
import 'package:flutter/material.dart';
import 'package:flutter_riverpod/flutter_riverpod.dart';
import 'package:no_signal/providers/Auth.dart';
import 'package:no_signal/themes.dart';

import 'pages/chat_page.dart';
import 'pages/home_page.dart';
import 'pages/loading_page.dart';
import 'pages/login/login_page.dart';
import 'pages/login/create_profile.dart';
import 'pages/popup/settings.dart';
import 'pages/userslist_page.dart';
import 'pages/welcome_page.dart';

void main() {
  //  to ensure widgets are glued properly
  WidgetsFlutterBinding.ensureInitialized();
  //  provider scope is nessary to access the all the providers
  runApp(const ProviderScope(child: MainApp()));
}

//  I used a stateful widget so that I can use the initState method
//  to check if the user is logged in or not
//  and then decide the course of action
class MainApp extends ConsumerStatefulWidget {
  const MainApp({Key? key}) : super(key: key);

  @override
  ConsumerState<ConsumerStatefulWidget> createState() => _MainAppState();
}

class _MainAppState extends ConsumerState<MainApp> {
  Future<void> _init(WidgetRef ref) async {
    //  This is how you can access providers in stateful widgets
    final user = await ref.read(authProvider).getAccount();
    if (user != null) {
      //  This is how you can modify the state of the providers
      ref.read(userLoggedProvider.state).state = user;
      ref.read(userLoggedInProvider.state).state = true;
    } else {
      ref.read(userLoggedInProvider.state).state = false;
    }
  }

  @override
  void initState() {
    super.initState();
    _init(ref);
  }

  @override
  Widget build(BuildContext context) {
    return MaterialApp(
      title: 'No Signal',
      themeMode: ThemeMode.dark,
      darkTheme: NoSignalTheme.darkTheme(),
      theme: NoSignalTheme.lightTheme(),
      debugShowCheckedModeBanner: false,
      home: const AuthChecker(),
      routes: {
        LoginPage.routename: (context) => const LoginPage(),
        HomePage.routename: (context) => const HomePage(),
        CreateAccountPage.routeName: (context) => const CreateAccountPage(),
        ChatPage.routeName: (context) => ChatPage(),
        UsersListPage.routeName: (context) => const UsersListPage(),
        SettingsScreen.routename: (context) => const SettingsScreen(),
      },
    );
  }
}

//   This is authchecker widget which is used to check if the user is logged in or not
//  since it depends on state we do not need to use navigator to route to widgets
//  it will automatically change acc to the state
class AuthChecker extends ConsumerWidget {
  const AuthChecker({Key? key}) : super(key: key);

//  So here's the thing what we have done
//  if the _isLoggedIn is true, we will go to Home Page
//  if false we will go to Welcome Page
// and if the user is null we will show a Loading screen
  @override
  Widget build(BuildContext context, WidgetRef ref) {
    final _isLoggedIn = ref.watch(userLoggedInProvider.state).state;
    if (_isLoggedIn == true) {
      return const HomePage(); // It's asimple basic screen showing the home page with welcome message
    } else if (_isLoggedIn == false) {
      return const WelcomePage(); // It's the intro screen we made
    }
    return const LoadingPage(); // It's a plain screen with a circular progress indicator in Center
  }
}
And That’s it We have finally implemented Authentication successfully in our App.

Let’s see how it works
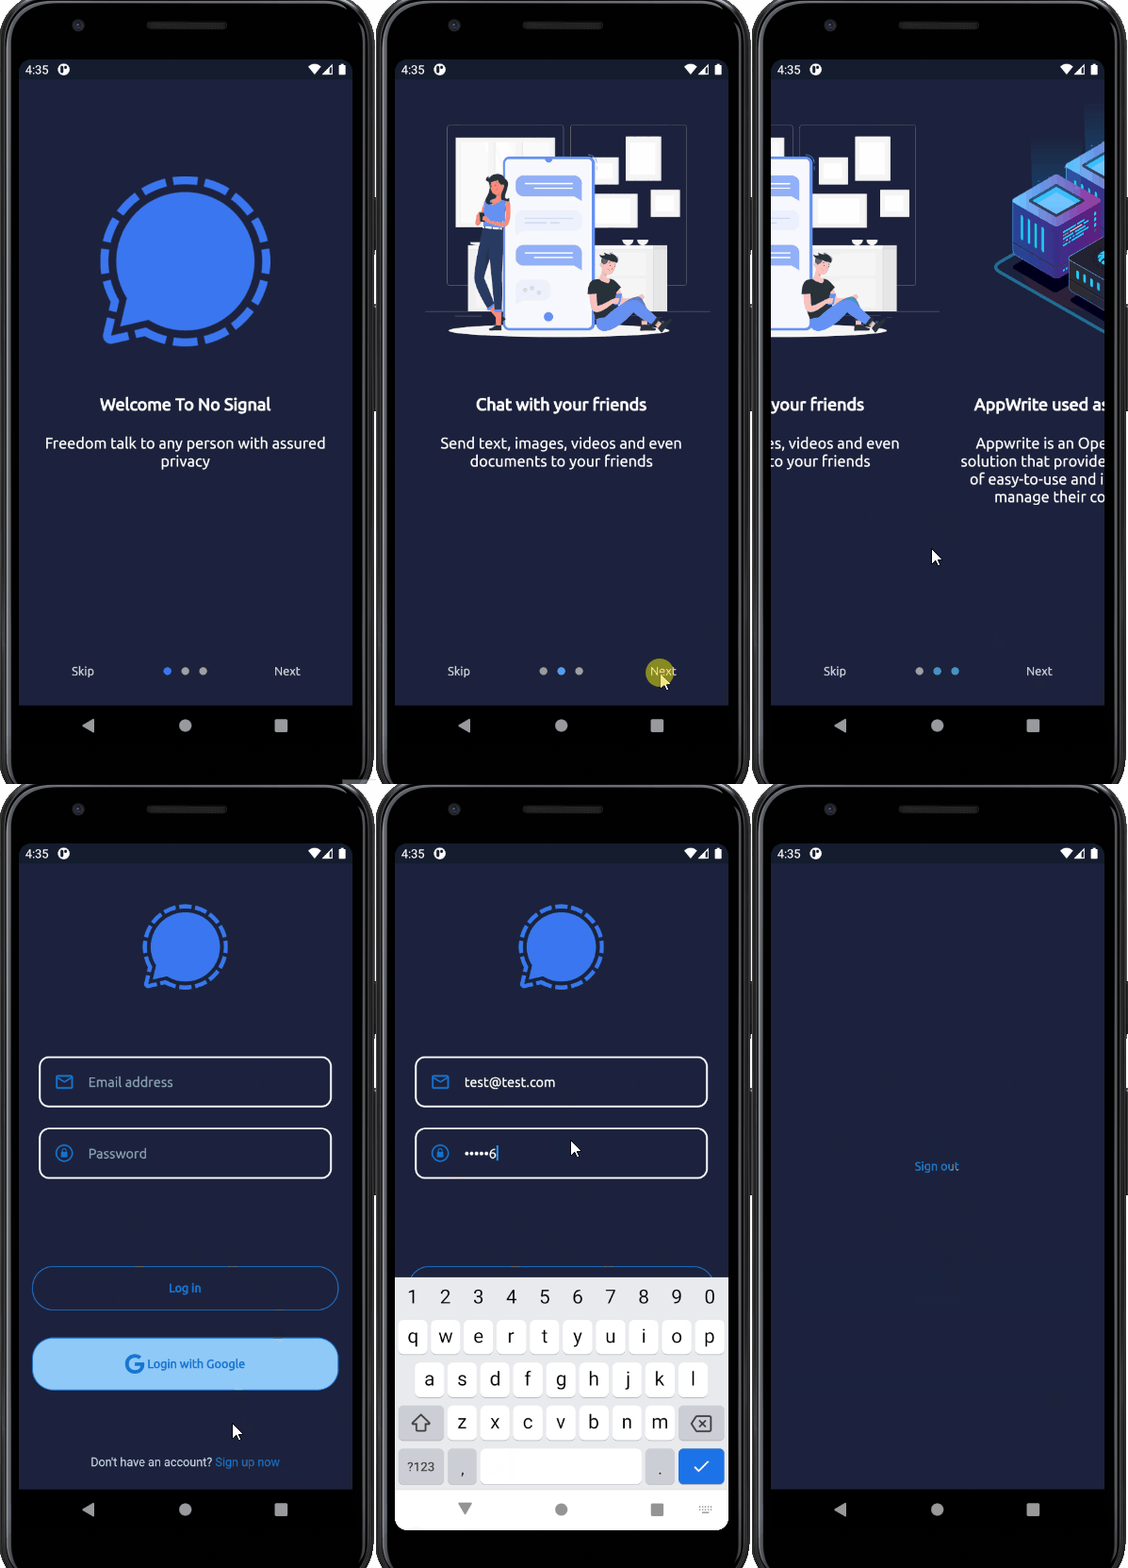
Working App (Authentication)
And That’s it for now. Thanks for reading till the end. Hope you learned something unique. I will be using Database API in the next part
Till Then Stay tuned 😉
EDIT 2:
- This blog is now in accordance with appwrite 1.0.0 +. Check out the changelogs here
- Bumped and updated all the dependencies
EDIT:
- This blog is now in accordance with appwrite 0.14.2 . To know what features have changed check here.
- Riverpod is now in the stable version. Migrated to a stable version and fixed all the breaking changes.
Read the Second Part Here